Sunday, 15 July 2012

A Twine Pom Pom Tutorial

I think most of you probably already know how to make twine pom poms. This tutorial is a just-in-case. Aaand I wanted to make some pom poms.


So, this is what you need: Twine. Fork. Scissors. That's it. Grab your materials...


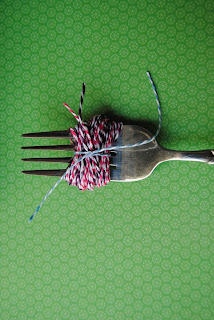
And now choose which colour you'd like to use for your pom poms. You can use one colour, two colours, three, four - However many you like! For this pom pom, I'm using two - Jewel and Felicity. Take your twine and wrap it around your fork.


Like so. 

And now wrap, wrap, wrap your twine around and around and around and around - I tend to wrap the twine about 50 times, depending on how many colours I'm using.


And cut.

Now, for the purpose of this tutorial, I'm going to use a different colour to tie the twine together.


Cut a small length of twine. Use this twine to tie a tight knot around the middle of the 
wrapped-twine-on-the-fork...


Like so. 

{At this point, I'd dearly like to know how to turn that photo around, and why it turned itself around in the first place, but I'll move on...}

Push your twine off your fork, and you should have a cute little bundle like this:


Now take your scissors, and cut through the loops on each end.


Just like that.

Now, squash that little sucker between your fingers...


... Grab your scissors and cut, cut, cut! Trim all the way around, squashing it in several directions to make sure you get it all nice and round-ish. This next photo is after I've finished trimming:


Not as scraggly anymore. :)

Then fluff, fluff, FLUFF your pom pom! Get your fingers in there and push, pull, prod and poke until you're quite satisfied that you have, indeed, made yourself a little twine pom pom.


Congratulations!


And one more photo, since Lorelai was so desperate to help me today.


Love.

May the twine be with you,
Angie. xx

Wednesday, 11 July 2012

Pinterest

Hello again!

I've recently joined Pinterest. I held off for a while. Do I really need to be on Pinterest?

Oh, yes. Yes I do.

So many fabulous ideas! D.I.Y.s, tutorials, inspiration - oh my!

Of course, my first search was for twine. Anything, everything, twine. I found twine dispensers, twine decorations, twine flowers... I found this flower repinned by Mara Magali, and her link leads


And I found these cute little twine lanterns, repinned by Amy Schaet, which will lead you to 


Of course, I couldn't resist putting up a picture of my own, which I pinned right here.


If I only looked for twine on Pinterest I probably wouldn't waste much of my 
increasingly-rare-time-to-myself time - but I can't stop at twine. The craft! The ideas! The CAKES!


Chocolate Peanut Butter Cupcakes, anyone? Delicious! I mustn't! I can't!

Oh, I will.

'Til next time,
Angie. xx


Follow Me on Pinterest

Tuesday, 3 July 2012

Twined-Up Hair Accessories!

Hello! I've been experimenting again!

 My latest little twine project has been to decorate some hair accessories. It was so simple, and I loved the effect! The first was a twine-covered alice band (head band). 


What's harder than making a twine-covered headband?

Taking a photo of a two-year-old wearing said headband!

To make it, I bought a cheap alice band, covered it with double-sided sticky tape on the outside and wrapped my chosen twine around it, using glue on the underside as I went along. 
Easy! And I love it! 

The next hair accessory was a hair clip. For this one, I plaited three twines together (Felicity, Jewel and Phoebe), covered a clip with double-sided sticky tape on the top and laid the plaits along the top, using a little glue here and there. Then I brought the ends under and used my trusty hot glue gun to keep the ends in place. 


I really like this one, it looks perfect for this cold weather.
What do you think?

Until next time,
Angie. xx