Friday 24 August 2012

A Paper and Twine Daffodil Day


"This  Daffodil Day, Friday 24th August, every daffodil and every donation grows hope. Hope for better treatments, hope for more survivors and hope for a cancer-free future. Help us beat cancer."

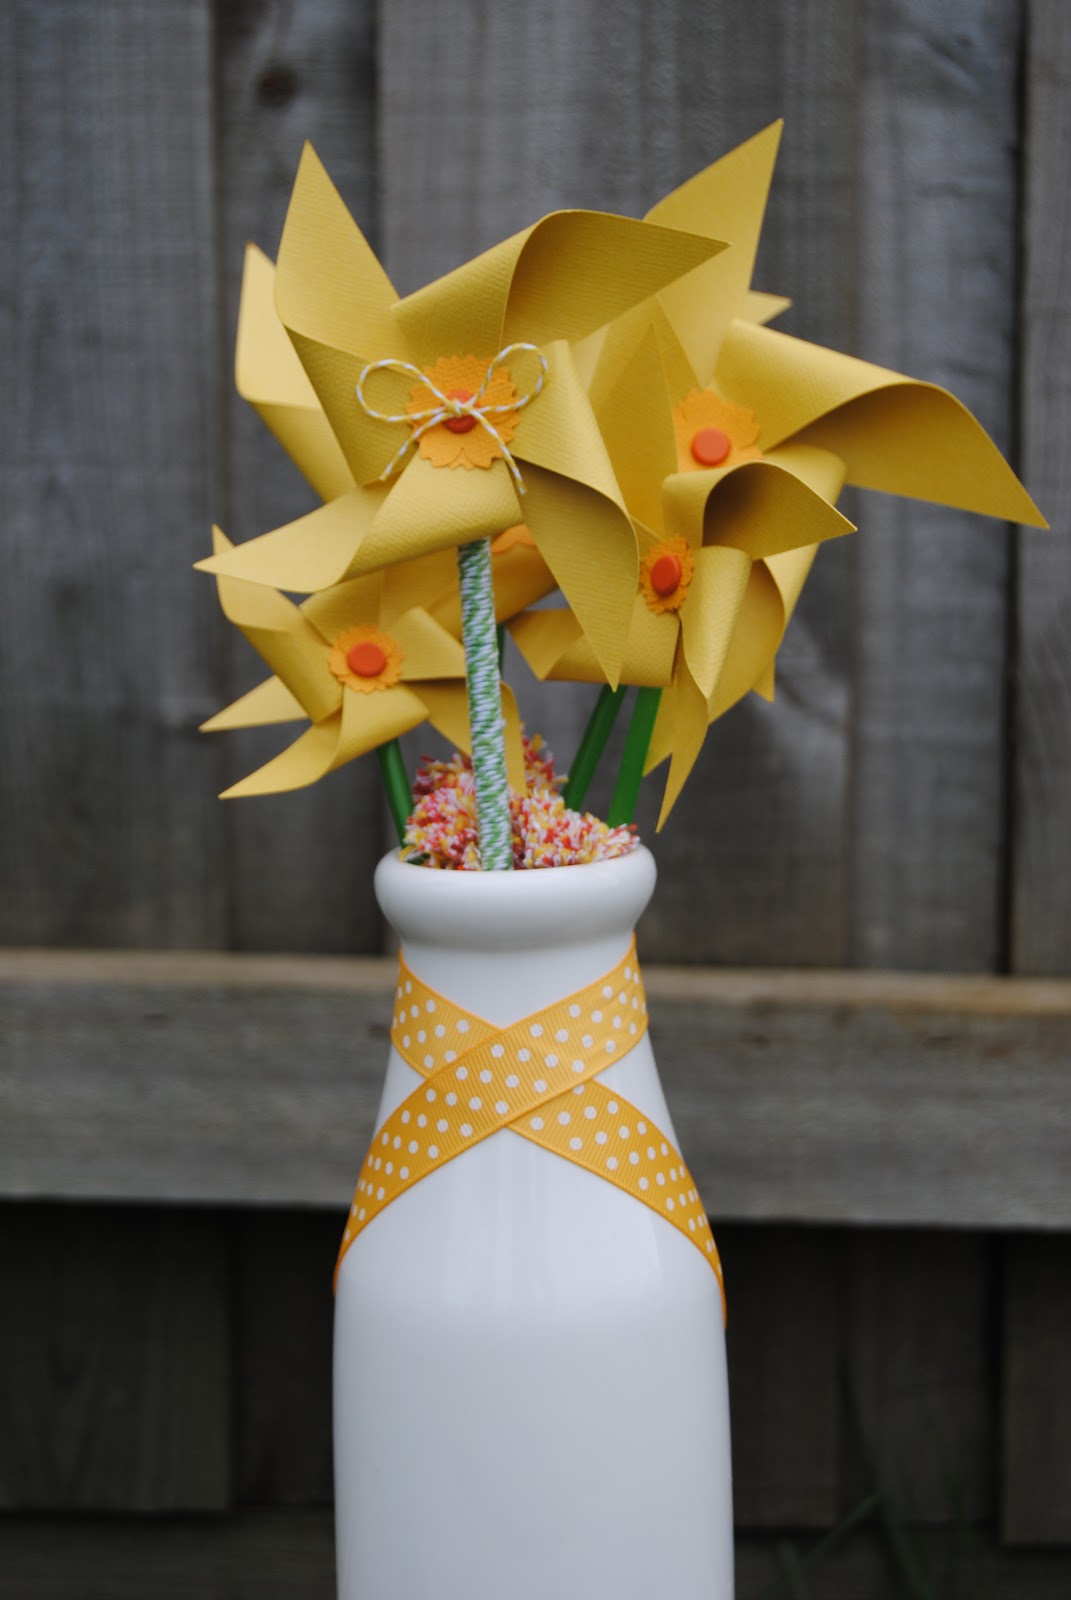
I felt inspired to make my own daffodils this Daffodil Day. I made a pinwheel for the main flower. Do you know how to make a pinwheel?


Cut a square of cardstock, any size you like. Then fold it into a triangle, and a triangle again. Open it up and cut along those lines, almost to the middle. Now you have four sections. Take one corner of each section and bring it in to the middle. I first punch a small hole in those corners and secure my pinwheel with a brad (the orange circles in the middle of my daffodils).

You've just made a pinwheel. Pinwheels are fun!


I added a brighter yellow small paper flower for the centre of the daffodil.

I used green straws to make the stems. I punched a hole in the straw, then took the brad all the way through and secured the whole lot together.

And for the daffodil at the front, I added a Whimsy Farm Twine Jemima bow, and wrapped the stem with Whimsy Farm Twine Tabitha.


For some added colour, I made some Jemima and Clementine twine pom poms.


And a cheerful polka dot yellow ribbon finished it off!


If you'd like to make a donation to the Cancer Council in Australia this Daffodil Day, please visit the
 Daffodil Day website.

Until next time,
Angie. xx

Monday 20 August 2012

The Perfect Bow

Hiya, my twine friends!

This is a post I've wanted to do for a while now, since I learnt how to do a perfect bow.


 I used to have major bow-envy. My bows always looked kinda squished and lopsided, with one tail up the top and the other down the bottom. Now, thanks to Kylie at Scrap To The Max, I know how to get my bow nice and neat, with the tails both at the bottom! Hooray!

Alrighty, we're going to start with this loop. It kinda looks like the Breast Cancer Foundation ribbon. 


Notice that what will become a 'tail' is on top of the loop. Now, pick up your loop (you may already be holding your loop!)...


... and hold your loop tightly between your fingers...


like so. Now, bring the OTHER tail around the loop, taking it around your hand.


Just like that. And bring that twine around the base of your loop, and pull it tight.


Tighter!


Okay, the twine is nice and tight around the base. Next, we want to make another loop, with the twine you've just brought around. This loop doesn't cross over itself like the original loop. This loop looks like this:


And then like this:


So you've got Mickey Mouse ears. Now take this new loop, and tuck the top of it through the circle of twine that was created when you wound the twine around the base of the first loop. Make sense? No? Here's a photo:


Now, here's where you might start to get worried. I know I was! "How is this going to work? It's just a big, twiney mess!" Take the top of that loop you're pushing through, and pull it. You might pull both loops at once. And then you get this:


Looks a bit like a bow now, doesn't it? Yay! So now we pull both sides tight so the middle turns into a knot. Like this:


 It still looks a bit messy, but don't worry. Here's where we neaten it up. Put your finger on the middle knot -


- and pull each tail until you're happy with the size and shape of the bow. Like this:


Now you can trim your tails, and look what you have...


A perfect bow!

The twine I used for this tutorial is Whimsy Farm Twine  "EllaBlue" . I love EllaBlue for elephants!


These elephant cupcake toppers and gift tags are from Whimsy Farm Parties.

Wow. This was a long post; for something so simple it takes quite a bit of explaining, especially in pictures. I hope it has helped you! 

'Til next time,
Angie. xx

Tuesday 14 August 2012

Tractor Party!

Hi there! This post is only to show off a little Clementine  twine in action.

I threw a tractor party at the weekend and, of course, I included a bit of twine here and there.

Here..


and there!


I love the twine with the hessian! And I can't get enough of 'kraft' paper these days; in fact, whenever I wrap someone's order of twine to send, I wrap it in brown paper and tie it with a twine bow. Pretty!

Here's a photo of the whole party scene.


Til next time,
Angie. xx
(If you'd like to see more photos you can go to my 
Whimsy Farm Parties Facebook page.)

Wednesday 1 August 2012

Whimsy Farm Twine Market Wrap-Up

Hi there! 

So, I took Whimsy Farm Twine along to the Akoonah Park Market in Berwick on Sunday. It was wet, it was cold - but it was fun! I love markets! And, I was placed right next door to a strawberry stand. Heaven! I ate plenty of those between talking to visitors. Here's my stand.


I also had my Whimsy Farm Parties items - cupcake toppers, gift tags, bit n pieces. So that makes up half the table - the other half was all twine. Spools! 5 metre samples! Multipacks! Twine!


A suitcase full of twine.


A wheelbarrow full of twine. (Love my wheelbarrow!)


And my Whimsy Farm Twine girls themselves. The favourite on the day? LadyBird.


I think the favourite item on the whole table, though, was this:


The lolly jar. Kids were spotting that baby from 100 metres away.

Can't wait to do it again!
'Til next time,
Angie. xx